Timers Lab
- Overview
- What is a timer?
- The Three-Step Checklist Reference
- MyFirstTimer.java
- BallLauncher.java
- DodgeBall.java
- Final required addition
- Advanced reading on multiple timers (Optional)
- Bonus
Overview
In this lab, you’ll begin to appreciate what a timer is, how it works, and how to use it to make cool stuff.
We’re going to start with a very basic timer. You’ll be able to get timers lab by checking out the repository from GitHub or by clicking on the link that was provided in canvas. Once you accept the assignment, make sure to from eclipse use the File->Import->Git->Projects from Git process that we outlined previously, making sure to select the appropriate actions as you move through. Be sure to read the entire document, as I’ll be asking you to commit and push at various parts while you’re working on the project.
What is a timer?
A Timer is a Java class whose sole responsibility is to wake up every X milliseconds.
You end up specifying how often you want a timer to wake up.
From an analogy standpoint,
it’s very much like a repeating alarm.
Since a Timer is a class,
to create one of these alarms,
we have to follow three steps.
The Three-Step Checklist Reference
Anytime you create a timer, you’ll need to do these three steps. Please read these steps and use this as a reference, we’ll go through the actual steps later in the lab.
Step 1 - Create a timer object
We create timers using similar syntax that we’ve used previously to create other Java objects:
import javax.swing.*;
Timer someTimerVar = new Timer(1000, objectToBeWokenUp);
- Make sure that you’re importing the
javax.swing.Timerclass. There are multiple classes that are namedTimer. - Instead of writing
import javax.swing.*;, remember that you can use Ctrl-Shift-O to have eclipse add the necessary imports for you. You may need it below for the class,ActionEvent.
There are two arguments for a Timer:
-
The number of milliseconds that should pass before it wakes up
Timer someTimerVar = new Timer(1000, objectToBeWokenUp);- Number of milliseconds = 1000 milliseconds
-
Which class should be woken up
Timer someTimerVar = new Timer(1000, objectToBeWokenUp);- Class to be woken up = objectToBeWokenUp
Timer someTimerVar = new Timer(1000, this);- Class to be woken up = this (The class that you’re currently in)
Step 2 - Setup the event handlers
Setup event handlers - ActionListener and actionPerformed - in the appropriate class
Any class that would like to be responsible for
handling the alarm must implement the ActionListener interface.
ActionListener is part of java.awt.event, so you may need to import java.awt.event.* to use it.
The ActionListener interface has just one method:
public void actionPerformed(ActionEvent e)
So every time the timer wakes up,
it calls the objectToBeWokenUp’s actionPerformed method.
The structure that you follow is very similar to implementing mouseDragged,
except that rather than you responding to mouse events,
you are responding to events that the Timer is initiating.
We don’t want to spend too much time doing anything complicated in mouse events
or handlers like actionPerformed.
If you are curious,
put a for loop that counts from 0 to a billion in mousePressed,
and watch the program lock up.
It does this because java treats timers and mouse events as being very important,
so important that it stops doing other things
(like listening to other events)
until those handlers are finished.
So what you do in each should be small,
and not have too many nested for loops or very long loops
so that your program doesn’t hang.
Step 3 - Call the timer’s start method
Timer someTimerVar = new Timer(1000, objectToBeWokenUp);
While the new Timer line shown above sets up the Timer,
it does not turn the timer on.
To start the timer so that it repeatedly calls actionPerformed,
you must tell that particular timer to start,
by calling its start method.
So to start the Timer,
you’ll see a line like this shortly after creating a Timer object.
someTimerVar.start();
MyFirstTimer.java
Let’s go ahead and open up MyFirstTimer.java to start writing in the code.
Notice that here we have a simple GraphicsProgram with a
GLabel added to the screen.
If you run the program,
you’ll get a simple window with a label that does nothing.
First, create a Timer in the **run** method
- Name the timer anything you want
- Have the 1st argument be
1000 - Have the 2nd argument be
thisHaving these two arguments meansMyFirstTimer(this) will be notified every second (1000ms). - Implement the
ActionListenerinterface.- Let’s add
implements ActionListenerto your MyFirstTimer class definition:
public class MyFirstTimer extends GraphicsProgram implements ActionListener {as well as an
actionPerformedmethod inside the class.public void actionPerformed(ActionEvent e) { //TODO add what we want to do every two seconds } - Let’s add
- Move the label horizontally every 1000ms.
- Go ahead and have
myLabelmove 5 pixels to the right, while moving it zero pixels in the y direction.
- Go ahead and have
- Make sure that you call
start()on the timer you created inrun().
If you added in all of these steps, you should see this when you run the program.

If you don’t see it move, make sure that you have done the steps we outlined above.
Second, create a numTimes instance variable
Let’s create a private variable numTimes
that keeps track of how many times actionPerformed has been called
To do this in run(),
make sure to initialize that number to 0,
and increment numTimes at the start of actionPerformed.
Now just for fun,
let’s change the text of the label so that it updates the label with the numTimes,
we can do this by calling setLabel like this:
myLabel.setLabel("times called? " + numTimes);
When you run the program again, you’ll notice the text will slowly move and will also update every second or so with the number of times that it has been called.

The Timer objects in java have a lot of flexibility and so I encourage you to later look at all the ways you can use and leverage a timer. But for now, I want to direct you to two methods:
stop(Stops the timer)- Stops the timer
setInitialDelay- Takes an integer for how many milliseconds you want to delay before constantly running the timer.
It’s best to add the delay before calling start.
Third, add a three-second delay before the timer starts
While the concept of stop seems simple enough, it may not always make sense as to when or who should be able to make the timer stop.
- Add a call to stop the timer in
actionPerformed. - We declared our Timer as a local variable; convert the timer to an instance variable instead.
- Use an
ifstatement to say that we want to stop the timer whennumTimeshas reached 10.actionPerformedis called many times, so we want to check for a specific time that we would want to stop the timer.
In this situation, When you run your program, you should get to a screenshot that looks like this: (if you add a return statement, then you may end without it moving one final time)

Once you have that, commit and push your work, make sure to put a brief message in the commit that explains the three things a timer needs and then move on to the next task.
BallLauncher.java
So far, we’ve mostly been showing the basics of Timers, however, Timers end up being extremely useful in many situations, since they allow you to run threads.
- Threads are separate processes that run independently from the program’s main loop.
- If you want to learn more about threads, follow this link
This is going to be useful for creating animations or having any movement so that the movement and animations can be made independently of what the user clicks on or interacts with.
Similar to mouse events, the timer events happen independently of what is going on in other parts of the game, this allows us to create some very flexible & awesome programs.
While it may be tempting to have many different timers, I suggest for now that you have a single timer and call it more often.
For example:
If you only need something to happen every second (1000ms) and your timer is happening every 500 ms,
create a numTimes variable and check to see if numTimes is even.
Let’s go through a slightly more complicated example by opening up BallLauncher.java:
If you run at this point, what you’ll notice is something similar to our earlier interactivity lab. When we are clicking the mouse button, it is making a ball at the same height as our mouse cursor but on the left hand of the screen.
For example, if you click in different areas of the screen, you’ll notice red circles on the left-hand side based on where your cursor is when you click, like so:

The code that is in the file is the following:
public class BallLauncher extends GraphicsProgram {
    public static final int SIZE = 25;

    public void run() {
        addMouseListeners();
    }

    public void mousePressed(MouseEvent e) {
        GOval ball = makeBall(SIZE/2, e.getY());
        add(ball);
    }

    public GOval makeBall(double x, double y) {
        GOval temp = new GOval(x-SIZE/2, y-SIZE/2, SIZE, SIZE);
        temp.setColor(Color.RED);
        temp.setFilled(true);
        return temp;
    }
}
Review of the Code
Most of this should be a refresher,
the one thing to notice is how we are using a constant SIZE to create a circle.
Remember that since we want the circle to appear at the center of where we click,
we are subtracting SIZE/2,
from where we click,
which will cause where we click to be the center of the circle instead of the top left.
makeBall is just a convenience method to help make a red-filled ball.
What we are going to do is to move all of the balls that are created to the right.
To start this,
we want to make an ArrayList of GOvals,
which we can call balls.
Go ahead and declare a new ArrayList as a private instance variable at the top,
initializing it in run.
The other thing we want to do is after makeBall is called,
we want to add that ball to our list of balls
by calling the add method that pertains to the ArrayList.
Visually at this point,
nothing would have changed if you run the program.
Let’s add something visual to our program.
Setup a timer that moves all of the balls in our ArrayList
-
Make two more constants
public static final int MSMSstores how often we want the timer to be woken up (set this to50)
public static final int SPEEDSPEEDtells us how much to move each ball by each time (set this to2).
- Make a Timer object and start it.
- (Can’t remember how to do this? Go back and review.)
-
Just like in the first file, you will make
BallLauncherthe one to respond to the timer.-
Our
actionPerformedmethod will be fairly simple. We will have it iterate through the ballsArrayListand move each one by SPEED in the X direction and 0 in the y. -
If you haven’t tried doing a for loop using the : operator to iterate through a list, now would be a good time to try.*
Once you handle the
actionPerformedevent by:- moving all the balls in the list
- creating and starting the timer
you should run your program again and click around. Notice how you have something that feels much more dynamic and expressive!
If you are still curious about how my version behaves (or you just want to observe your professor’s antiquated clicking habits for 15 seconds), you can click here.
-
- Once this is working,
you should commit and push your code again
- Use the message “all balls move across the screen”.
If it’s not behaving how you would expect, review the three-step checklist above.
Adding a Ball Launch cooldown
The last thing we are going to add is a limit to the number of balls that someone can launch at any given time, which is like a cooldown
While there are many ways to do this, what we are going to do is simply:
- Cycle through the list of balls
- Look to see if any have an x coordinate that is less than 100
- By calling
getX()on a single ball - If there is a ball that has an x coordinate that is less than 100,
then we know
mousePressedwas just recently launched, so we can just return frommousePressed, and ignore the user’s press of the mouse button.
- By calling
Doing this will cause your program to behave as if it has a cooldown like this gif shows.
Once you fix that and read the note below, commit and push this next change.
- As part of your commit,
in your own words,
write a sentence or two in the commit message text that would describe what would happen
if you were to use
pausein anactionPerformedmethod.
“OK, Bye pause!”
Note
One thing some of you might have remembered
is that GraphicsProgram has a pause() method
that would simply pause the program for a certain amount of time.
Why do we have to go through all this trouble of doing timers if we can simply call pause()?
The reason is because of how mouse events work together with animations. To make things animate and still respond to mouse events, all of those events need to be done in a way where the computer can respond to both and not get confused.
If you think about our discussion,
what would happen when you click the mouse
while the program is going through the list and moving all of the balls?
In the case of having the timer,
the program will wait until it is done with the
actionPerformed before it calls mousePressed,
so that it feels like both work at the same time (aka concurrently).
Because mouse events and our timers both involve the user interface,
java will know enough that it can coordinate between the two.
However,
if you decide to use pause,
java does not realize that you are just pausing to add some pizzazz to your movement.
So if the mouse is pressed,
it will interrupt whatever loop it is in at the moment.
If you try to replace your timer with a pause and a while loop,
you’ll notice that once you run the program and click a couple of times,
you’ll get a ConcurrentModificationException.
This exception means that you are trying to modify the list of balls,
while the program is currently cycling through and moving them,
something that you cannot do when you use the for loop with the : operator.
I’ve given the bad example below of what your run shouldn’t do
(unless you want to get the ConcurrentModificationException).
// This is buggy code
public void run() {
    balls = new ArrayList<GOval>();
    // movement = new Timer(MS, this);
    // movement.start();
    addMouseListeners();

    // Having this while loop and for loop is no bueno!
    while(true) {
        for(GOval ball:balls) {
            ball.move(SPEED, 0);
            pause(MS);
        }
    }
}
DodgeBall.java
Alright, so now that you have some experience let’s try to make a very simple game by using timers and some randomness.
We’re going to add a little bit to our ball launcher game but rather than just add on top of that one, we’re going to work with a copy of it.
-
Open DodgeBall.java and run it.
Notice that it works the same as BallLauncher at the moment. What I’ve done is added a couple of additional convenience methods. With our newfound ability to launch balls, let’s try to have our users aim those balls at others.
To help us with this, I ended up adding an
ArrayListofGRectscalledenemies, which are just going to be green rectangles. I have already added the code to create the empty list of enemies inrun.There is also an analogous
makeEnemyfunction which will create a green square to represent our enemies. To make it easier to use, I only have it provide a y coordinate, and the method automatically places the enemy on the right-hand side of the screen.You’ll also notice that we have a
RandomGenerator rgenthat we have created. One last refactoring that you’ll see is that I created bothaddABallandaddAnEnemyfunctions, each of which will call their respectivemake____functions, and then add them to the screen and their respective lists.Lastly, I moved the ball movement for loop into its own method,
moveAllBallsOnce(). The last thing is that you’ll see that I have anifstatement that acts like the cooldown you wrote earlier. -
Call
addAnEnemyin our timer.- However,
we don’t want to call
addAnEnemy, every timeactionPerformedis called, but rather every once in a while. - This is where something like that
%operator works great if we add anumTimesinstance variable that works similarly to what we implemented in the first timer example, (feel free to initializenumTimesto-1if you want the enemy to appear faster, or to decrease it from 40 to say 5, as I did here). - Because we are keeping track of the number of times
actionPerformedis called, we can simply say every 40th time, go ahead and make a new enemy,
if(numTimes % 40 == 0) { addAnEnemy(); }- Normally I would want you to make 40 a constant, but you can leave it like this for today (or you can just click on 40 and then click Refactor->Constant in the menu).
- However,
we don’t want to call
-
Once you add these lines of code in
actionPerformed, run the code again and watch the green squares slowly take over! -
When the squares appear commit and push your code again with the message “enemies populate screen regularly”.
You can still have circles appear but right now they will just run over the squares. We’ll get to that in a bit.
The next thing we want to do is to make the enemies have some type of movement
- Have each enemy randomly move between say a -2 and +2
- Use
rgen.nextIntto give us a random number between these and then have it move this much.
- Use
-
Leveraging the code we have for
moveAllBallsOnce, create a method callsmoveAllEnemiesOncethat will cycle through the list of enemies and call move on each one, moving it 0 pixels in thexdirection and a random integer (SPEED) in theydirection. -
Call
moveAllEnemiesOnceinactionPerformed.Once you run the program now, the enemies will come to life! Here’s a version where the enemies are being generated more quickly, but the movement is correct.
They will be very wiggly.
- At this point you should commit and push again, with the message “added wiggly enemy movement”.
Final required addition
At this point, I’m guessing that you probably want some way to get rid of these green squares using the ball. While there are many ways for checking to see if a ball and rectangle overlap, that’s not part of this course, so I’m going to explain a very simple way of checking to see if the ball may have hit a square.
One thing you can do is that for every red ball -
when it’s their time to move,
check a point just outside of the ball and call getElementAt.
If the object that is given back is an instanceof a GRect,
we could say it’s an enemy and then make that enemy disappear.
In this case,
we’ll want to check the red point in the picture below:
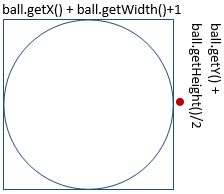
Turns out that if we do have a potential enemy in front of us
(by calling getElementAt using the measurements shown above),
then we want to remove it not only from the screen (by calling remove)
but also from the enemies.
Once you run this you should be able to make the green squares disappear
by having the balls hit them!
You may also notice that some balls will not completely disappear unless the
ball collides with that midpoint,
but that is sufficient for this lab.
Once again,
commit and push since you’ve added something cool,
in the commit message detail what it is you added.
To get full credit for this lab, you should have your program make the squares disappear and follow all the directions on when to push your code. Make sure to push your final changes to your repository by the deadline.
Advanced reading on multiple timers (Optional)
If you’re curious, here’s an explanation of how to implement multiple timers in your program. Read this at your own risk.
Bonus
“Hey! This is almost a game!”
While this does not yet have the polish of some of the games you may
tend to play,
there are many things you can do to make it more polished.
For example,
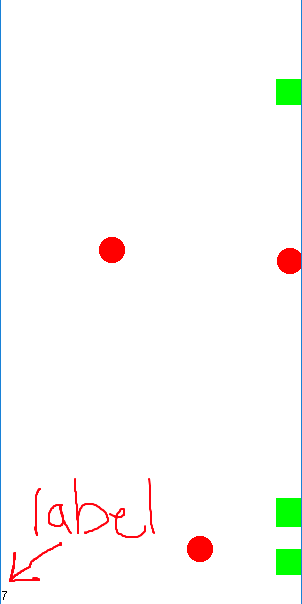
you could add a label that is continually updated or set in actionPerformed
that would update the number of green squares that you have removed from the screen
(see the version on the left).
Or you could instead (or in addition)
add in checks to say if there are more than MAX_ENEMIES on the screen,
then stop the timer,
remove everything and add a message telling them they lost.
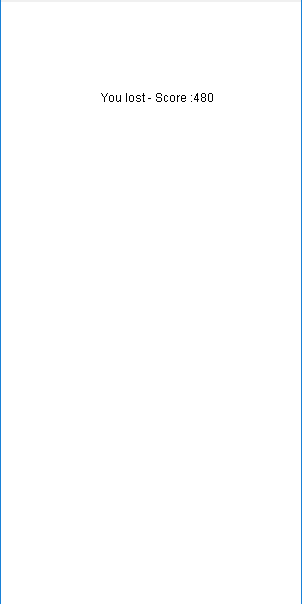
Lastly,
it’s fairly simple to give them some indicator of progress or score.
On game over, present them with the numTimes variable,
which is representative of how long they were able to last in playing the game
(see version below).
Hopefully, you can see how easy this is to extend
and how much fun you can start to have in creating these things and making the game your own,
with your changes.
Hopefully, you see the powers that timers can have
in making your programs more dynamic and expressive.