Intro to Java Lab
- STEP 1: Generate a function/method in Hello.java
- STEP 2: Download the zip file from Canvas
- STEP 3: Import the project into eclipse
- STEP 4: Create a Fractions class
- STEP 5: Fill out the Fractions class
- STEP 6: Override the toString() method
- STEP 7: Create multiple constructors and test code
- STEP 8: Submit a picture of your program finishing
STEP 1: Generate a function/method in Hello.java
Before you go onto the java lab for today, go into your hello world project in eclipse and make sure you feel comfortable writing at least one function/method. We’ll be using the words function & method interchangeably.
You can check this by:
- Making the “hello world” line into a function (like
sayHello()) - Calling that function in
main - Ensuring you get the same output when you re-run the program.
You are expected to know how to create general functions. Here’s a refresher:
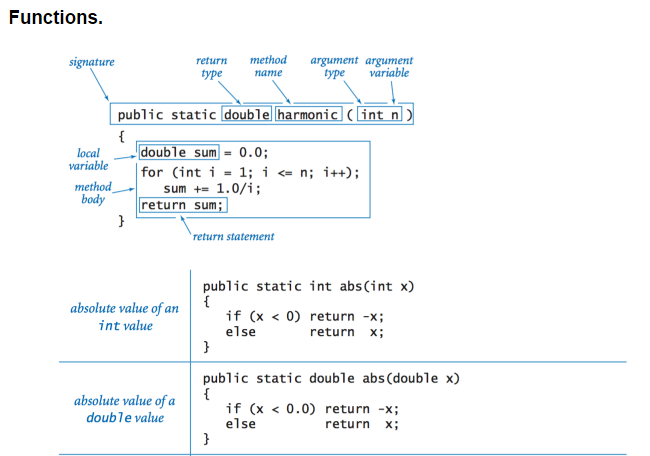 Image from Princeton’s Intro Java Course
We’ll talk more about the use of the static keyword later,
but you will not be using it most of the time.
STEP 2: Download the zip file from Canvas
Make sure that you downloaded the zip file from the Lab Assignment Page on Canvas. No need to unzip it, just have it in a temporary location.
STEP 3: Import the project into eclipse
You can download the file as a zip file and leave it as is. There is no need to unzip the contents. Once Eclipse is open, go to File->Import, then click on General->Existing projects into workspace, and then click Next.
On this screen, click the Select archive file option, then click Browse, locate the zip file, and then hit OK. If you don’t have the zip but have an actual folder, use the Select root directory option on top instead.
Once you’ve located the zip file or directory, you’ll be able to hit Finish.

Once you do that,
notice that you’ll have two projects now in the project explorer.
It’s OK to leave the other projects there.
You should leave all projects that you’d like to see or reference in the future in your workspace,
so keep them there until you run out of space in the package explorer window.
If you are somehow against having so many projects open,
you can right-click on the project,
and say close project,
instead of delete,
which will keep the project in your workspace,
but make files disappear from being edited or run.
Your COMP55IntroJava project will be shown on the left-hand side,
but it will have several red X’s  -
that means that Java has found some issues for you.
-
that means that Java has found some issues for you.
Eclipse is organized into many small areas, including a window that will show you both errors and warnings, so you could examine them if you wanted to. Examine the problems in the window, or open up the file and double-click on it and then hover over the red squiggly mark, and you’ll see an error. The next animation shows you how to do both.

The error in the source code states something like, Fraction cannot be resolved to a type which means, “I have no clue what this Fraction is that you speak of”. This is because we have yet to create a class to represent a Fraction. In Java, the Fraction class that we create will serve as a blueprint for how all Fractions will behave and what they will store. Placing code in classes that then can be instantiated via objects is the foundation of object-oriented programming. Let’s start and create a class now.
STEP 4: Create a Fractions class
Go ahead and create a Fraction class file. While you can do this as a quick fix. Let’s do it the regular way. Right-click on the COMP55IntroJava project label itself in the Project Explorer, and then go New->Class. Once you do that, Eclipse will bring up another form to fill out (Just like you had with Lab 1). This time, only change the class name to Fraction and then click Finish, which will bring you back to the main window.
A couple of the options
that would be relevant are including the main method stub (1st checkbox).
Unlike in C++,
where you can have just one main class,
Java allows each class to have its own main method.
Then rather than just saying that you want to run the project,
you can run any class that has a main method.
This is useful when you want to test a particular class.
In our scenario,
the entire main method could be copied into the Fraction class
and then we would eliminate the need for TestFraction
(but we won’t copy it over there for this lab).
When you do have more than one main method in a project,
to run a particular main you can just right-click on the java file
whose main method you want to run and then go to -
Run As -> Java application.
Or you can use Ctrl-F11 with the file that you want to run open in the editor.
STEP 5: Fill out the Fractions class
Once you click Finish,
the Fraction class will be added to your project
and you will notice it has very few lines in it,
just the Fraction and the curly braces { }.
The curly braces tell the computer
that everything inside of those two outer curly braces is part of the Fraction class.
While normally I would have you write out the code.
In this situation,
I’m going to provide you with a little bit of help initially
so that you feel more comfortable getting started with Java.
Eclipse is extremely powerful in helping you generate Java code
so you don’t have to worry about the syntax as much.
As long as you understand the concepts,
you will be able to go to any problem in the problems window,
right-click on it,
and then hit the Quick fix to see if any of the fixes make sense.
For example,
let’s go back down to the Problems Pane
to see what the error the program is mentioning, which is the
constructor Fraction(int, int) is undefined.
Remember that constructors are a special set of instructions (like a method)
that one could use to help set up a fraction.
In this case, when we would like to say something like new Fraction(3, 4),
it should use the 3 and the 4 passed in and set the numerator and denominator to those values.
The fact that we will represent a fraction as two numbers
(even though it is a single number)
is an example of the object-oriented principle abstraction.
In this scenario,
we are finding a way of representing some data
and working with it in a general
(dare I say abstract) way.
To help us write this class, without knowing much java, we are going to rely on Eclipse.
Now right-click on the error “The constructor Fraction(int, int) is undefined” and select Quick Fix (or press Ctrl+1). You should see a window pop up that gives you a couple of options:
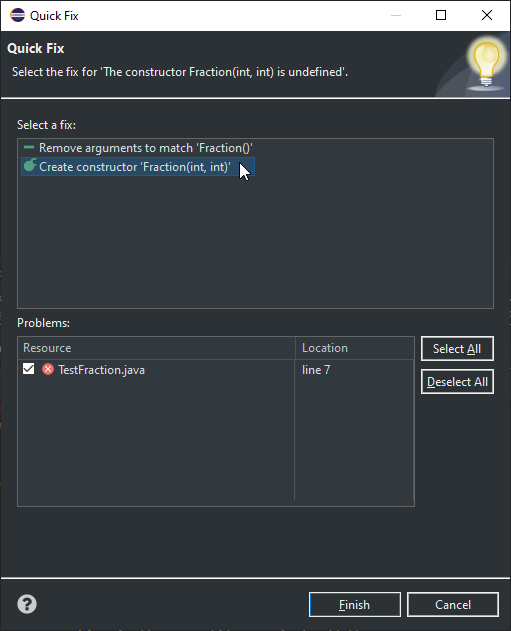
Make sure the option to create the constructor is selected and click Finish. You’ll now see code that looks like this.
public class Fraction {

    public Fraction(int i, int j) {
        // TODO Auto-generated constructor stub
    }
}
Unlike C++,
because we are working in the same file,
we just add the word public,
as well as the name of the file and the arguments we want to create the constructor with.
Also, make sure to Save (Ctrl+S) the file.
Notice the comments look the same,
but there is a comment followed by the TODO,
which is a nice way of remembering that you have to go back and write the code in there.
Also,
notice that any comments with TODO will have a blue checkbox on the left side
 and a blue box on the right side of the file
 ,
so you can quickly scan a file and see what’s left for you to complete.
We know that as a constructor,
we want to store the parameters into instance variables (AKA member variables).
It makes sense to change the parameters
,
so you can quickly scan a file and see what’s left for you to complete.
We know that as a constructor,
we want to store the parameters into instance variables (AKA member variables).
It makes sense to change the parameters i and j
to num and den,
and then to store the contents of each variable
into variables numerator and denominator.
We want the numerator and denominator to be instance variables,
so rewrite your code so that it is now:
public class Fraction {

    public Fraction(int num, int den) {
        numerator = num;
        denominator = den;
    }
}
Once you finish typing and Save (Ctrl-S), you’ll notice that new errors pop up in the problems pane again, as well as the red/pink squigglies. Hover over the errors to read the quick fixes here (or again, move your keyboard’s cursor to somewhere where the error is and type Ctrl-1), and you’ll see a list of options of different ideas that Eclipse has for fixing your error. What we want is to declare each variable as an instance variable (Eclipse calls instance variables fields). If you perform that field quick fix for each, that will insert the following two lines above the constructor.
private int numerator;
private int denominator;
Notice that the variables have changed color to light blue,
which is an indication that they are instance variables instead of local variables
(which have a tinge of yellow) or arguments
(which are more gray).
This is how you declare instance variables,
just with the word private before each variable declaration and outside of any method.
private and public work just like they did in C++.
Also remember that with object-oriented programming,
we want most of our variables to follow the object-oriented principle of encapsulation.
We want those variables hidden from other classes
so that if we want to change the variables in the future we could.
To help us write the getters and setters (AKA accessors/mutators), we’ll also use Eclipse. With Fraction.java active, right-click in the editor inside the Fraction class and then go to source->generate getters and setters. Once you do that, you’ll get the window that shows up in the image below. Select the options like I did to have eclipse write the accessor/mutators (known in java as getters and setters) for you.

There are some additional options you can play with
(like the insertion point option)
that will allow you to place where you want the code generated to be inserted.
Once you click OK and finish,
notice the additional code.
The errors still appear at the bottom but will go away once you save.
Now open up TestFraction.
In the code,
you’ll notice there is still a TODO
and you can certainly write more code to flesh out the class which involves the next step.
While it’s nice that Eclipse does some basics for you,
it should help you think about how to make a class more robust.
For example:
- Should
setNumeratorandsetDenominatoraccept all numbers? - Should the class do anything else?
You should modify your code so that if someone asks to set the fraction’s denominator to zero, it will just ignore the request. Having setters in particular helps with encapsulation since we can introduce logic in our setter method to protect those hidden variables from having unwanted values. Concentrate on adding coherent and reasonable logic to a class.
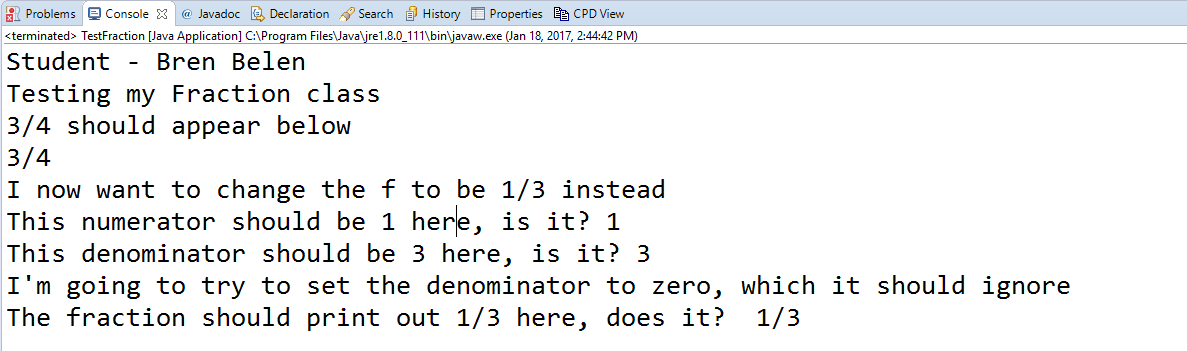
Think about what the TestFraction code is doing.
What will it print out?
Once you have an answer,
run TestFraction and see if you guessed correctly.
When you look at the output when you ran the program,
the second line in the output is printing out something like Fraction@2a139a55.
However,
the numbers after the @ symbol will be completely different.
Those numbers stand for the actual location in memory
where that Fraction object currently resides on your local computer.
To have the Fraction class print something more useful,
we have to override toString().
STEP 6: Override the toString() method
toString() is a method that returns a String and takes nothing as the arguments.
You can generate the body of toString
by right-clicking on the file and going to source->generatetoString(),
but the important thing is to think about what string you want to form
or have the class print when println is called,
which in our case will be something like 1/3.
To combine variables with actual text and concatenate them,
you can use the + operator to join two or more pieces together.
STEP 7: Create multiple constructors and test code
Now that I’ve shown you how to override the toString,
I’d like you to create multiple constructors to make the fractions class more flexible.
Finally,
you’ll need to write test code that can help you make sure that your Fraction class is working.
As you are doing these steps, I urge you to explore and ask questions and use your classmates as a resource, as we won’t have a full walkthrough of how to do these. I’ll be putting up additional guides and resources of information for you in the future on Canvas so that you can make more sense of all the neat things Eclipse and Java can do for you.
STEP 8: Submit a picture of your program finishing
To get credit for this lab,
submit a picture after just having run your project,
making sure the code from Fraction and console windows are viewable.
You will need to add a println to your FractionsTest.java file that shows your own name.
In your picture,
you should have the code for Fraction.java present,
while the console window should have the printout of the test code given.
To get full credit,
the toString method must be overwritten.
Upload the picture by the assignment’s due date.
Make sure that your picture includes:
- The code for Fraction.java
- The console output window - displaying the output
While your picture will not look like the one below (since you have a dark mode and you’ll be including the code), the output text from the console should look something like this.