Event Handlers and Listeners
- Introduction
- Old I/O Programs
- What’s an event?
- The Five Mouse Events
- The MouseEvent parameter
- Understanding when all events are called
- Mouse Motion Events
- The Rubber Band
- Real Dragging
- Bonus: Getting the object to bounce correctly
Introduction
If you still feel uncomfortable with either the ACM or the Intro to Java Labs, you should go back and revisit what was done in each. Today we’re going to get you started on learning about events that will allow us to add some dynamic content to our upcoming graphics program.
Old I/O Programs
Most of the programs you have created for COMP 51 and 53 have had a very linear structure that was based on text input and output. While the programs that you created were dynamic in that they asked the user for input, the program would explicitly wait for users to type and press enter before moving on. The program controlled when users could input information. The program would run through its statements, and when it reached the command to get input from the user, it would then wait for the user to type in some piece of information. While it was waiting, the program would not be able to do anything.
Your computer once it needs to wait for your input

This also happened with the user,
as they had to wait until the program told them it was their turn.
If a program had a cin statement,
the program would stay waiting there,
until the user pressed the Enter key,
at which time your program was able to continue its execution.
This “either you or the computer is in control”
is not typically the way we think about software.

Most modern software allows you to make decisions at any time. For example, with a media player, if you click play, the media starts playing, but you are also given a stop button, rewind, as well as other features, that you can click on at any time. Rather than you or the computer having sole control of the program at a certain time, modern programs make it feel like we can take over control at any time, which is great. The question is… how can they do this? To help explain how we need to understand the notion of an event.
What’s an event?
A computer event is a special “happening” that a program may find important. A good real-life analogy is an unexpected real-life event (like a friend telling you that your parents just posted an embarrassing childhood photo of you on social media). In that case, you (or the computer) might be currently occupied with a task. However, if you were to find out that this event occurred, you may have to stop what you are doing, handle the event, and then resume what you were doing.

There are several different computer events out there, which each program can decide how to handle. Some examples of computer events are the mouse moving or a keyboard key being pressed. When users move the mouse or press a key on the keyboard, Java can be set up to immediately notify any subscribed object about that event.
You can find the starter files for this project by going to the starter files section in Canvas and looking for InteractivityLab.zip. Import the project and open up Ball.java and run the program. What you’ll notice in the program is a very rough animation of a ball bouncing horizontally.
Here’s what you should see (approximately):
Once you finish this lab you can think about how to make the ball bounce more cleanly off the window.
The ACM libraries have made it easy for you to subscribe to mouse event notifications -
one can subscribe by calling addMouseListeners().
Once that line is called,
your program will be notified of all mouse events.
This is typically done towards the end of the run method and only needs to be done once.
Enter the line:
addMouseListeners();
in your run() method,
but BEFORE the animateBall() function,
which is an infinite loop that is taking care of moving the ball.
If we make the call to addMouseListeners after animateBall,
it will never be called.
Think of addMouseListeners as setting you up to get notified in case anything happens.
The Five Mouse Events
By calling addMouseListeners,
the ACM conveniently sets you up to be notified about five events,
these are
mousePressed– called when a mouse button shifts from not being pressed to being pressedmouseReleased– called when a mouse button shifts from being pressed to not pressedmouseClicked– called when a mouse button goes from not pressed, to pressed, to not pressed with little to no movement when the mouse is pressed.mouseEntered– called when a mouse cursor comes inside the bounds of the program (the program window)mouseExited– called when a mouse cursor leaves the bounds of the program
When we are notified of each of these events we need to decide how we want the program to respond. For example, going back to our real-world event about the embarrassing photo, if the embarrassing photo was posted by your parents, you need to choose how you would handle that situation. Some of you may decide to ignore the photo, others may decide to talk to your parents about social media, while others of you may hack into your parents’ account and delete the photo, and instead leave an embarrassing photo of your siblings in its place. How you handle the event is up to you.
If we want the computer to do something special when an event happens, we need to define a method that contains the code that responds to that particular event. These are known as event handlers, because they specify what code we want to execute when that event happens. As I’ve mentioned before that Java notifies us about any of the events listed above, what it does is call the event method name listed above for all objects that added themselves as a listener.
Our first event handler in Ball.java
For this lab we will define our response like this:
when a user presses a button,
we will change the ball’s color to a random color.
To do this we are going to write a definition for mousePressed.
To do that,
introduce the following method definition in your Ball.java code:
@Override
public void mousePressed(MouseEvent e) {
    //code to tell the computer what to do when the mouse is pressed
}
It’s useful to write the @Override
label because it tells Java that what you are doing
is defining a special method that it should recognize.
If it doesn’t recognize the method that you are trying to define,
it should raise an error (red squiggly).
While providing @Override is optional,
if you were to misspell mousePressed,
as musePressed for example,
Java would have no way of knowing whether you intended
that method to be an event handler or if you writing a program about pressing muses.
All the mouse events are public
because they are being called by Java classes that are foreign to our program.
Let’s have our event handler set the color of the ball to a new random color.
We are going to use a convenience function written using the RandomGenerator class.
Go ahead and set the color on the ball inside the mousePressed method.
Inside the parenthesis of the setColor
method for the ball,
write rgen.nextColor(),
which will provide us with a randomly generated color each time the mouse is pressed.
ball.setColor(rgen.nextColor());
After you make this change, go ahead and run the program.
Make sure that as the ball is moving,
you click on that mouse with unbridled fury.
Notice the color of the ball is randomly changing every time you click the mouse.
If we want to make changes to any objects,
they must be listed as instance variables (like ball is).
Remember that “Java” is the one calling this method,
and it has no clue of what information you’ll need.
If you need to change a value or object inside a mouse handler,
you need to make sure that object is listed as an instance variable,
otherwise, you won’t be able to make the necessary changes.
Before you move on, make sure that you can change the colors.
The MouseEvent parameter
Each of these mouse events has a parameter object that accompanies the event.
That object,
which is of type MouseEvent,
carries useful information about the state the mouse was in when the event occurred.
For example, if the mouse was pressed,
what was the coordinate at where the mouse was pressed?
Which button on the mouse was pressed?
This parameter of type MouseEvent
is commonly named e to stand for the event.
To make our program more exciting,
let’s move the ball to where our mouse location is.
Inside the mousePressedfunction,
add a call toball'ssetLocation.
To set the location,
we need to provide anxand ay.
We will not move thexin this case,
but just theycoordinate.
To keep the horizontal movement,
ask the ball for its x location by callinggetX()
on the ball and then just set it back reflexively as its x location again.
To get the y, however,
rather than callinggetYon the ball,
we are going to callgetYon theMouseEvent,
which will return to us the y coordinate of where the mouse was pressed.
In yourmousePressed``` function,
the line you added should look like this…

Run the program again and make sure to click in a couple of different
areas.
Notice that our mousePressed method is relatively short and without loops.
We are doing some small operations
which allow us to feel like the ball is immediately responding
and then continuing back to moving from side to side.
If you’d like the ball to be placed in the center of where the mouse cursor is,
you’ll have to do a little bit of math on the y coordinate to make that happen,
but we’ll leave that for later.
When you run the program,
you should get behavior that is similar to this:

Being able to retrieve information about the cursor location when the mouse is clicked is nice,
because we can use that information to make some simple decisions as well.
Let’s combine the information about the mouse,
along with another method called getElementAt,
which will return to us a GObject
at a specific coordinate if one is there.
If not, it will return null.
Let’s use getElementAt to only change the color of the ball when we click on the ball,
which would mean that if we call getElementAt
and pass in the coordinates for the mousePressed event,
getElementAt can detect whether or not we clicked on the ball.
To do this,
let’s change our mousePressed method to have an if statement
where we check if the element at the mouse coordinates is in fact,
the ball.
If it is, then we’ll change the color.
Otherwise, we’ll move it to where our mouse cursor is.
The tricky part is generating the condition for the if
statement here which should be something like if(getElementAt(e.getX(), e.getY()) == ball),
which essentially says,
is the x and y coordinates of where I pressed the mouse on top of the ball?
If so, change the color and otherwise set the ball’s location.
Once you make the changes,
test it again,
making sure that you understand how getElementAt works here.
We can compare or use the double equals because as you’ll remember,
we are dealing with pointers,
so it will check to see if the objects are the same object in this situation
by comparing address locations.
Here’s what it should behave like at the end (it would continue bouncing too)

Understanding when all events are called
The easiest way for us to understand how and when all of the mouse events are called
is to do one of my favorite things when I’m first learning to program in a language,
which is, print a bunch of stuff.
For this part,
what we are going to do is override all of the mouse events
by writing method definitions for all five mouse events so far.
In every method definition,
make a System.out.println() call with a unique message in each method –
things like “mouse pressed” for the mousePressed method.
You can just add the call at the end of mousePressed.
Here’s what the code would look like for mouseReleased:
 @Override
 public void mouseReleased(MouseEvent e) {
  System.out.println("mouse released");
 }
All of the methods take the same MouseEvent e parameter,
so you can leverage that and change your code a bit for each method.
Once you do that,
run the java applet and click once.
Notice how many events get generated!
You can also try to see if you can get it so that mouseClicked is not generated.
Override all of the mouse event handlers in java before continuing.
Again here are the five so you can use the names:
mousePressed- called when the button is pushed downmouseReleased- called when the button is releasedmouseClicked- called after the button is released (and not moving much between press and release)mouseEntered- called when entering the bounds of our windowmouseExited- called when exiting those bounds
Mouse Motion Events
While this is all great and everything, what makes programs truly dynamic is moving the mouse and dragging. We haven’t talked about calls like moving the mouse.
That is because those events have been split off from the five we’ve just discussed
in the traditional java sense,
they are categorized as MouseMotion events.
In standard Java,
to listen to these events we would have to register ourselves as a MouseMotionListener
in addition to a MouseListener.
Nonetheless, the ACM library makes it easy for us.
Because we called addMouseListeners(),
this is a convenience program
written by GraphicsProgram that allows us to also receive
notifications for the following two events:
-
mouseMoved– called whenever the mouse is moved on the screen and no buttons are pressed -
mouseDragged– called whenever the mouse is moved on the screen and a button is pressed
Go ahead and use the println statements to override these two event handlers in Ball.java.
Both of these events take in the MouseEvent e as a parameter.
Notice how so many more events are being generated!
It’s not just that one mouse movement event is being generated for when you move the mouse,
but java is continually spamming you with event notifications
even during what you would consider to be one movement.
With so many event notifications,
we need to be careful with how we handle those events
and want to avoid taxing the computer during that method call.
We will talk about how to deal with dragging in a bit.
The Rubber Band
Let’s move to another code example
that helps us to understand how dynamic our programs can become
by doing something as simple as working with a line and dragging it.
Go ahead and open up your RubberBand.java,
which looks almost identical to Ball.java when it was first created,
except that there is nothing in run.
So add the line addMouseListeners() to the run method.
Now that notifications about mouse events are set up,
your job will be to handle two events:
- When the user first presses a mouse button, and
- When the user drags.
When the user clicks and drags we are hoping to modify an existing line. So because we need it to persist between event calls, we need to make a line object as an instance variable.
So let’s create an instance variable (not a local variable) of type GLine
(we’ll call the instance variable newLine),
after the constants.
private GLine newLine;
Now, let’s write a method for mousePressed.
This method will:
- Create a new
GLine - call
addon that new line to have it appear on the screen.
Inside of mousePressed,
assign a newly created GLine to the instance variable newLine.
Remember that the parameters for a new GLine are x1, y1, x2, y2.
We need to provide actual values there,
so for this example,
let’s create a line with zero length.
We can do this by passing in the parameter for where the mouse button was clicked
to each of the four parameters
(e.getX(), e.getY(), e.getX(), e.getY()).
Once we create the GLine
and add it to the screen,
if we were to run the program,
we would see nothing happen if we were to click.
The screen will still be empty.
Make sure to check that you did not redeclare newLine inside of mousePressed.
The trick that we are going to add here is what we do on dragging.
Go ahead and define the mouseDragged(MouseEvent e) method.
When we drag,
we are going to change one of the line’s endpoints to reflect the new position of the mouse cursor.
This can be done by calling GLine’s inbuilt function setEndPoint
which takes in an x and a y parameter.
We set the new endpoints’ x and y coordinates from the MouseEvent.
Once you write this correctly you should be able to click and
then drag,
and you will see a line that is growing and shrinking as long as you keep the mouse down,
like if you were playing with a rubber band.
Once you release the button,
you are no longer able to change anything about the line,
with the code that we have.
Now, every time that we press the mouse button,
we create a new line,
this means that our users can create a multitude of lines to form a picture.
Go ahead and make a small picture
and follow the instructions provided on canvas for what you need to submit.

Real Dragging
We’re almost there and then you can work on getting everything going!
Before we continue,
we have to do one more thing,
which is to talk about dragging.
Let’s open up the Dragging.java file.
This program has two objects,
an oval and a rect,
on the screen.
If you look at the code,
I’ve already written the method definitions for the three mouse events,
as well as call addMouseListeners for you here.
What you have to do is concentrate on getting the dragging to work properly.
The first thing that people tend to do from a dragging standpoint,
is to simply override mouse dragged by getting the location of the object
and possibly calling setLocation.
Go ahead and try to do this first.
Add these two lines to the mouseDragged event handler
and then run the program, which will be buggy.
toDrag = getElementAt(e.getX(), e.getY());
toDrag.setLocation(e.getX(), e.getY());
One thing you’ll notice is a lot of null pointer exceptions
as well as the code not working too well.
Try dragging upwards and to the left
instead of downwards and to the right,
you may notice that one feels more like it’s dragging than the other.
Two things can happen here.
Let’s deal with the first one,
which is a null pointer exception.
This can happen if we tend to click in an area where an object is not present.
If we ever do this and call getElementAt,
getElementAt returns null.
This means that if we try to call say setLocation on null,
we’ll get a null pointer exception raised.
Java is nice in that it continues to try to run the program and recover afterwards,
but you’ll notice this happens a lot.
An easy way for us to stop generating the exceptions is to add an if
statement after our getElementAt.
We only want to set the location of toDrag
if in fact,
toDrag is not null.
Otherwise, we are trying to set the location of a null object.
Go ahead and
add an if statement to only call setLocation on toDrag if toDrag is not null
and then run the program again
(Ctrl-F11).
What you’ll notice now is that no more exceptions are being generated
but the behavior is pretty much the same -
we can’t drag upwards and to the left.
The reason for this is what happens with setLocation.
Remember that here setLocation
is being called on the upper-left-hand corner of the object,
which could make it so that once we call a drag event,
the mouse cursor is already outside the bounds of the object,
and so it is not on top of an object anymore.
One easy fix that we can use is to change our setLocation
so that we set the location to be the center of the object.
Thus rather than say setLocation (x, y)
we need to subtract half of the shape’s width and height from x and y,
which are both defined as SHAPE_SIZE.
Go ahead and make that change now and re-run the program,
your program should now behave like this:
Now it starts to feel a little better!
There are still a couple of things that are off.
One of the big ones that can occur is when you drag the blue oval over the green square,
and if you pay close attention,
you’ll notice that you leave the blue oval behind and start dragging the green square.
Another one that happens is
if you start with your mouse clicked somewhere away from one of the two objects
and while the mouse button is down,
you move into one of the shapes.
You’ll notice that you’ll immediately start to move it.
This happens because the only event
where we are doing anything significant is in mouseDragged.
This means that it’s only handling messages when the mouse is down.
What we want to do is instead,
keep track of if we started initially by pressing the mouse button when we were on top of an object.
If so, we should set that object to be the one that we drag.
Then in our mouseDragged,
we can continue to drag the object that we clicked on.
Let’s change our code so that the getElementAt happens in
mousePressed instead of in mouseDragged,
and re-run the program.
That will allow us to drag the same object everywhere,
the one that we initially pressed the mouse button on.
Once you try to move everything around,
you can notice that everything is working closer to what we expect.
The last thing we want to eliminate is the jumpiness
that happens when we barely click on one of the corners.
To make this more evident,
let’s go ahead and change SHAPE_SIZE to be 300
so that we have a large circle and oval and run the program again.
Slowly drag the blue oval from its edge,
and you’ll notice the oval almost immediately jump to its center.
(You may also see this in the video above when you click on one of the corners).
In reality,
what we want is not for it to jump like this
but if we grab the oval from one of the edges and move,
we want it to move however much the mouse moved.
To do this,
what we need to do is keep track of that the mouse has moved between mouseDragged events,
so we are going to introduce two instance variables,
lastX and lastY.
Go ahead and add those into the variables up top.
Then we will set the lastX and lastY in mousePressed.
You can set those to the mouse coordinates from MouseEvent e.
Now what we want is that each time mouseDragged is called,
we want to use the current coordinates and the last known coordinates of the mouse
to measure how far it has traveled.
This will allow us to know how much and in which direction the mouse has moved.
If we know the direction and how much the mouse has moved by,
rather than call setLocation on the object,
we can use those calculations to figure out how much to move
the object by in the x and y direction.
Then after moving the object,
the last thing we want to do in mouseDragged is
to update the last known coordinates for the mouse cursor to be the current ones.
We’ll leave it as an exercise to use your classmates
to figure out the code that should be in mousePressed and mouseDragged
(your hint is that mousePressed should have 3 lines of code
and mouseDragged should have 4-5 lines of code).
You could do something nice like set
toDrag to be null in mouseReleased,
but in this situation it’s not needed.
At this point you can submit the project, by submitting just the java files via canvas.
Bonus: Getting the object to bounce correctly
Coming back to the bouncing ball,
one thing we should be aware of for a ball is where getX and getY
get their coordinates from,
which is the upper-left hand corner of any object.
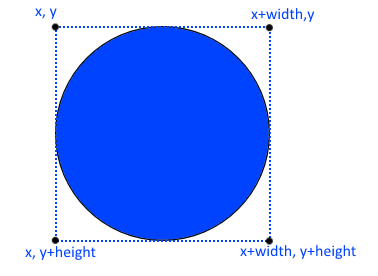
Remember that calling getX and getY will get us that upper-left corner
So if we want to check to see if the ball has bounced on say the right edge,
we need to include in our calculations the width of the ball
to check to see if it has reached the edge of the screen.
By including the width,
we can make sure that we can keep the ball on the screen.
In addition to modifying the code so that it bounces off more clearly,
you can also add a yVelocity,
which should only be flipped (like we do with the xVelocity,
when we reach the top or the bottom of the screen.
It’s best to create a new method to check the vertical bounds
and make that separate from the horizontal bounds,
so that way it is easier to change the velocity of x or y.
Once we add the yVelocity,
we should be able to make what looks like a bouncing ball that bounces off the
screen.
Similar to the figure below.
You should have enough now to make something somewhat interesting.
Use the mouseMoved event handler to move a rectangle like a paddle,
and then use getElementAt to see if you ever hit that other object.
Good luck!